Thursday, September 29, 2011

Pinterest Project - Day 29 {Mummy Lights}

Con-Man's 7th birthday will be in just a couple of weeks.
He's decided to do a spooky-ish costume party.
I love this because it means I don't have to wait until after his birthday to put up fall/Halloween decor!
I've got tons of cool Halloween stuff pinned in my Holiday Stuff board - and Mummy Lights is one of them.
Unfortunately, as it sometimes happens on Pinterest, the pin doesn't go anywhere!!!
I HATE that I can't give credit where credit is due, so if you know who originally posted the Mummy Lights, please let me know.  I'd love to give them a little plug!

This is my original inspiration:

And here are my little mummies!


I didn't take pics of the process - it's just way way too easy.
I cut strips of cheese cloth (same that I used for those floaty ghosts).
Wrap strips around jar - I didn't even glue or tape, it kind of sticks to itself.
Hot glue googly eyes onto cheesecloth.
Put tea light candle inside and light!


*Tomorrow will be the last day of my Pinterest Project.  But it will be far from the last day I post my inspirations from Pinterest or the projects I actually try!  You'll especially see a lot more Halloween projects coming up as I prepare for Con-Man's party!*

Wednesday, September 28, 2011

Pinterest Project - Day 28 {Cloth Diapers!}

When I had Monkey Man (now 3 yrs old), I made the blind leap into using cloth diapers.
Honestly, the first thing that drew me to them was how cute they are.
That's bad, I know.
But then I quickly learned how much better they are for baby, the environment, and my wallet.
I knew as soon as I became pregnant again this time that I'd want to use cloth again.
I'm starting over completely with my diaper stash, so I decided it's a good time to start sewing a few of my own!

If you look online, you'll find lots of good patterns for diapers.
I've pinned a few patterns as well as some sites with great info about cloth diapering and accessories in my Diaper Stuff board on Pinterest.
By far, the one mentioned the MOST online is the Classic RRP - Rita's Rump Pocket Pattern.

And there is a reason this one is mentioned so often - it's AWESOME!
This pattern is used to make a one-size fits most flannel fitted pocket diaper without closures.
BUT it can be changed up a little - add snaps or applix to close it up.
Change out the outer layer with some PUL or fleece so you don't need a cover.
And of course, since it's a pocket diaper, you can stuff it as much or as little as you want depending on how much your baby wets!
Love it!

Here is the result of my first attempt at a diaper using the RRP Pattern:

Finished diaper, all folded and ready to wear


Outside and insides of diaper - without any snaps or applix, this diaper is reversible!


I'll be making lots and lots more of these!

Tuesday, September 27, 2011

Pinterest Project - Day 27 {Crockpot Italian Chicken}

It's kind of become normal here - another night with less than 4 hours of sleep.
Yikes.  If that's normal, I want to be WAY abnormal!
For some reason, between baby and my body, I'm getting trained for the lack of sleep that comes with having a newborn, I guess.
Because of that, when afternoon/evening rolls around I'm EXHAUSTED.
To the point that I can barely function, much less cook dinner before I take the boys to practice!
Enter my beloved {crockpot}.  I swear I hear angels sing when I lift her lid in the mornings.

I'm slowly going through different crockpot recipes in my Stuff To Eat board.
So far, we've liked everything!
Tonight, we are having Crockpot Italian Chicken that I found on The Girl Who Ate Everything.


Crockpot Italian Chicken

4 chicken breasts
1 packet dry Zesty Italian dressing (regular is fine, too)
1 (8oz) package cream cheese, softened (I used low fat)
1-2 cans cream of chicken soup (depending on how cream-cheesy you want it)

Place chicken in crockpot and sprinkle Italian dressing over it.  Combine cream cheese and cream of chicken soup in a small pot over low heat and pour over chicken.  Cook on low for at least 4 hours.  You can leave it in there all day.  Once the chicken is done, you can leave the breasts whole, cube it, or even shred it.  If sauce is too thick, you can thin it to desired consistency with a little milk.  Serve over pasta or rice.


On The Girl Who Ate Everything, Christy says that she knows everyone has this recipe.
Well, I'm super glad she posted it, because I didn't!
I used low fat cream cheese and I shredded the chicken at the end.  I served it with bowtie pasta because the boys think it's cool. :)  Sometimes it's all about pleasing them, right?!
This recipe is very simple, made with ingredients I already had here in my kitchen.
We all loved it and I'm sure this will be something I'll make on a regular basis - especially on 4-hours-of-sleep-days.


Monday, September 26, 2011

Pinterest Project - Day 26 {Olive Garden's Pasta E Fageoli}

My friend Jennifer over at Jenerally Speaking posted a recipe last week for Olive Garden's Pasta E. Fageoli.
Since that is my favorite soup at Olive Garden, I immediately pinned it in my Stuff to Eat board.  
I knew I'd want easy access to that recipe for this week.


Olive Garden's Pasta E. Fageoli


Ingredients:
3 tsp oil
2 lbs  ground beef
14 oz carrots, slivered
12 oz onions, chopped
14 ounces celery, diced
48 ounces diced canned tomatoes
2 cans red kidney beans
2 cans white kidney beans
88 ounces beef stock
3 tsp oregano
2 1/2 tsp pepper 
5 tbsp fresh parsley, chopped
1 1/2 tsp tabasco sauce
48 ounces spaghetti sauce
8 ounces dry pasta shell macaroni

Directions:
Saute beef in oil large 10 quart pot until beef starts to brown. Add onions, carrots, celery and tomatoes. Simmer 10 minutes. Drain and rinse beans and add to post. Add beef stock, oregano, pepper, tabasco, spaghetti sauce and noodles. Simmer until celery and carrots are tender, about 30-45 minutes.


*This is a huge success for us!  My boys didn't mention a word about the carrots or celery in the soup - normally they do.

What I really love about this recipe is it makes a HUGE pot.  I'll be freezing half of it for another meal.
If you don't need that much soup, though you can definitely 1/2 the recipe!

No, seriously - I mean a HUGE pot!


Sunday, September 25, 2011

Pinterest Project - Day 25 {The Best Broccoli of Your Life}

Yesterday I posted about our yummy lunch - Ranch House Pork Chops.
I wanted something healthy on the side of our pork chops, cheesy mashed potatoes and gravy.
Lots of gravy.
I had seen a recipe claiming to be "The Best Broccoli Of Your Life" on Amateur Gourmet.
With a name like that, how could I not give it a try?!

My older two boys are self proclaimed broccoli HATERS.
They aren't crazy about many veggies, but broccoli is really their least favorite.
I made them a deal though - just try one small piece.  If you don't like it, you don't have to eat any more.


The Best Broccoli of Your Life

4-5lb fresh broccoli, cut into large florets (dry thoroughly)
5Tbs olive oil
1 1/2 tsps kosher salt
1/2 tsp fresh ground pepper
4 garlic cloves - peeled and sliced

1 lemon
1 1/2 Tbs olive oil
3 Tbs toasted pine nuts (I omitted)
1/3 cup freshly grated Parmesan cheese

Preheat oven to 425 degrees.  Spread cut broccoli onto cookie sheet.  Toss with olive oil, salt and pepper.  Add garlic cloves.  Roast in oven 20-25 minutes, until "crisp-tender" and some of the tips of the florets are browned.

When it's done, remove from oven.  Zest lemon over the broccoli, squeeze the lemon juice over the pan of broccoli.  Add olive oil, pine nuts, and Parmesan cheese.  Toss to mix well.


So the verdict?  My boys asked for more...broccoli.  Seriously.  I had to pick my jaw up off the floor.
I mean, I knew I loved it, but my picky Broccoli Hater Club?  Wow.
The big difference is roasting!  I honestly had never thought to roast broccoli.  Boy were we missing out!  Now I can't wait to try even more combinations of flavors with roasted veggies.


Saturday, September 24, 2011

Pinterest Project - Day 24 {Ranch House Pork Chops with Parmesan Mashed Potatoes}

I've been trying to use my crock pot more and more lately.
It really helps save my sanity on busy sports days like today.
We needed to leave our house by 7:00am for two football games, then come home for lunch, short rest period and we'll head right back out for baseball later!
After football, the boys are HUNGRY!
So this morning before breakfast, I made Ranch House Crock Pot Pork Chops & Parmesan Mashed Potatoes, pinned from my Stuff To Eat board.

I originally pinned this recipe from Real Mom Kitchen, which is one of my go-to sites for great recipes!


Ranch House Crock Pot Pork Chops with Parmesan Mashed Potatoes

6 pork chops, 1/2" thick
2 packets dry Ranch Dressing Seasoning*
2 10oz cans Cream of Chicken Soup*

4lb peeled, cubed potatoes
5 Tbl real butter
1 cup fresh grated Parmesan cheese
6 cloves roasted garlic (with directions below)
1-1 1/2 cups warm milk
1 Tbs salt, or to taste
1 tsp pepper, or to taste

Place pork chops, Ranch seasoning and soup into a crock pot over high heat for 4 hours or on low for 6 hours.

Place potatoes into a large pot of cold water.  Cook on stove top over high heat and bring to boil.  Once water is boiling, cook until potatoes are fork-tender.  Drain and transfer into a bowl of a stand or electric mixer.  Mix on low until potatoes are mashed, then add butter, Parmesan, garlic, milk, salt and pepper.  For thinner mashed potatoes, add more milk slowly.

Scoop mashed potatoes onto serving plates and top with pork chops and gravy from crock pot.

Roasted Garlic - 
Preheat oven to 350 degrees.  Place bulb of garlic with skins on, wrap lightly in tin foil and bake for 1 hour.  Remove from foil and let cool for 15 minutes.  Remove garlic from skins, place in a bowl and mash with a fork until completely mashed.  Set aside.  One garlic bulb will have around 12 cloves.


*The original recipe called for 1 packet of Ranch seasoning and 1 can of cream of chicken soup, but Laura said that the only thing she would change for next time would be to double these ingredients to make more gravy.  I went ahead and did that and it was the perfect amount of gravy!


We all loved this easy, hearty meal!!!  My husband actually had three helpings!
And you see that super yummy looking broccoli on the side?
Well, I'll be posting the recipe for that tomorrow - you will NOT want to miss it!


Linking up here:


Friday, September 23, 2011

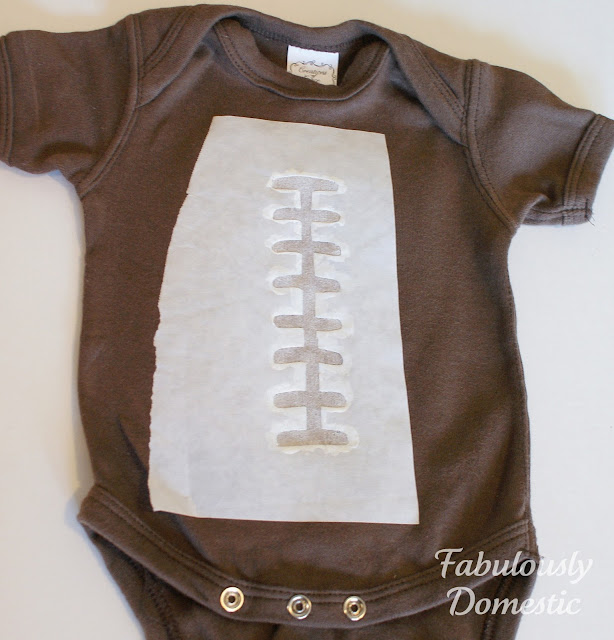
Pinterest Project - Day 23 {Football Onesie}

Baby boy will be born soon - sometime in November!
That means it'll be smack dab right in the middle of football season.
We are BIG football fans - the boys play, we love college ball and we also follow the Texans.
We ❤ football.

So what could be more perfect for our new little guy than a football onesie?!
I saw this Sports Illustrated onesie at Coroflot and pinned it to my Stuff To Make board.


I knew I wanted something similar, but a little more realistic looking.
I used the freezer paper technique (easy and fun!) to make my version.


Football Onesie

Materials Needed:
Brown onesie (purchased at Hobby Lobby or dye yourself)
Freezer Paper
Iron
White fabric paint
Paintbrush
Scissors or way to cut out lace design


Prewash onesie.


Sketch out lace design.  We have footballs everywhere, so I just used my son's as a guide.  
It does not have to be perfect!
Draw on matte side of freezer paper.


Cut out design.  This is now your stencil.


Iron shiny side of freezer paper down onto your onesie.  Make sure all the edges of the stencil are secure - you don't want paint bleeding under the edges.


Put piece of cardboard or several folded layers of paper inside of onesie so paint won't bleed through.  Paint inside your stencil with your fabric paint.  
You will probably want at least 2-3 coats of paint, allowing to dry in between.


Allow paint to dry completely.  
Sometimes (well, every time) I've been too impatient to wait the whole drying time.  
I'll use my blowdryer on low heat to help speed the process.


Peel back freezer paper.


And enjoy your cute little football onesie!!!
Make sure you follow package directions on your fabric paint.
Some kinds need to be heated with an iron, others need you to wait 24 hours before washing, etc.


Linking up here:


Join us Saturdays at tatertotsandjello.com for the weekend wrap up party!


Thursday, September 22, 2011

Pinterest Project - Day 22 {Pacifier Clip}

I really love making baby gifts!
When an order comes in through my shop or through a friend and I hear it's for a baby, I get excited!
Today a friend mentioned that she's got a shower to go to on Sunday and the mama-to-be is having a boy.
All sorts of fun things came to mind - onesies, burp cloths, blankets, booties, and pacifier clips to match!
But I've never made a pacifier clip - my boys never really took pacifiers.
Of course, on Pinterest I had already pinned some tutorials for making cute clips!

I had two inspirations, and sort of mixed and matched the parts of both tutorials that I needed for the supplies I had.  Sew, Mama, Sew! featured a great tutorial from Dana at Made.  Ruffles & Stuff did a great tutorial, too - her version costs less than $1!  Woo hoo!

Pacifier Clip

You will need:
Ribbon (14 inches)
Fray Check
Clip (suspender clips work great!)
Velcro
Pacifier
Sewing machine (or you can hand-sew)


Cut your ribbon to a 14" length and Fray Check the ends (not shown).
Slip the end of your ribbon through the loop on your clip.
Fold over and sew down. (I found a tight-ish zig-zag stitch worked best.)


Cut your velcro to the right size.
Sew one square at the end of the ribbon - 
I chose the softer side because this is the piece you'll touch more.


Next, sew the stiffer velcro square about three inches down.


Just loop the velcro end through the ring on the pacifier and you're done!


This time around I used ribbon because it was something I thought most people would have on hand.
Next time I may make a few different clips using fabric that coordinates with the onesie or gift set I've made.

Linking up here:


Join us Saturdays at tatertotsandjello.com for the weekend wrap up party!


Wednesday, September 21, 2011

Pinterest Project - Day 21 {I ❤ Brownie Waffles}

A couple years ago, I remember someone suggesting chili served over cornbread waffles.
I thought it was crazy, but tried it.
YUM.
We've made cornbread waffles a few times and really liked them - still soft, but a bit of a crunch on the outside.  Just perfect!

So when I saw Brownie Waffles on Random Thoughts Of A Supermom, I knew I had to make them!!!
I pinned it to my Stuff To Eat board, just waiting for a brownie-kinda-day.
Today was that day - little sleep last night, two doctors appointments, a few stressful things...
Surely that means I deserve brownies!

Brownie Waffles

You'll need:
Brownie mix - boxed or your own batter 
Non-stick spray
Waffle iron
(Yep, that's it!)

This is my waffle iron - the only one I own.
Yes, it makes heart-shaped waffles.
Don't judge. 

Spray that baby down with some non-stick spray.
Otherwise, you'll have just a bunch of brownie crumbs.
Yummy, but not so pretty.

Mix up your brownie batter and pour into the waffle iron.
Yep, that was a bit too much. 
And yep, I sure did eat the part that spilled over while my kids weren't looking.

And this is the finished brownie waffle.  
Mmmm
See that darker spot up there?
I just covered it with a little scoop of vanilla ice cream before I served it up to The Chief.
He didn't even notice. 


What I love most about making brownies in the waffle iron, is the texture!
Every part is just like the edge pieces of regular brownies.
Chewy, but with a little crispness.  
Sooooo good!